This article is a detailed instruction on how to connect API OCR by NodeJs. Through connecting APIs, you can build the process of extracting identity information automatically for personal credit card/account opening in such industries as telecom, finance, banking, etc.
Before connecting APIs, we should keep in mind some requirements of ID Card photos: Input image must show clearly all four corners and main parts of an ID Card such as: Photo, national emblem, personal information, etc. All information fields must be clearly seen and can be read by naked eyes, not erased or blurred. It does not exceed 5 MB and has the minimum resolution of about 640×480 to ensure accuracy. The ID Card area must take at least ¼ of the images.
Next, we will start connecting API OCR (ID Card recognition). To connect with API OCR, we need to create an account at Console.fpt.ai. If you do not have an account, create one right now to do the next step. Then create an API key to send requests to gateway (each default API key can send 50 requests only).
1. Backend
To connect with APIs in the backend, firstly, declare libraries. We use such libraries as ‘form-data’, ‘node-fetch’. ‘fetch’ here is a simple interface that helps send/receive APIs, ‘form-data’ is form data that helps send data in the predetermined form.
var FormData = require(‘form-data’);
const fetch = require(‘node-fetch’);
Next, we need to declare following the given form. The data used here is base64, so pass the key ‘image_base64’ into form data (req.body.data is the data of ID Cards in base64 format).
let data = new FormData();
data.append(‘image_base64’, req.body.data);
After declaring form-data, we will call APIs by ‘fetch’ with the ‘Post’ method. Pass API_key into header, pass data declared above into body. To use API_key, you need to create an account at Console, then create an API_key to send requests to gateway.
fetch(‘https://api.fpt.ai/vision/idr/vnm’, {
method: ‘POST’,
headers: {
‘api_key’: ‘******’
},
body: data
The final step is to get results back to ‘resData’. In this example, we only send and take information from an ID Card. Therefore, we get the first item in returned data resData.data[0].
then(resData => {
try {
if (resData.data[0]) {
res.json({message: “OK”, data: resData.data[0]});
} else {
res.json({message: “Not OK”});
}
} catch (e) {
res.json({message: e});
}
})
Finally, the returned data of ID Card’s front side will look like this:
{
“errorCode” : 0,
“errorMessage” : “”,
“data”: [
{
“id”: “xxxx”,
“id_prob”: “xxxx”,
“name”: “xxxx”,
“name_prob”: “xxxx”,
“dob”: “xxxx”,
“dob_prob”: “xxxx”,
“sex”: “xxxx”,
“sex_prob”: “xxxx”,
“nationality”: “xxxx”,
“nationality_prob”: “xxxx”,
“home”: “xxxx”,
“home_prob”: “xxxx”,
“address”: “xxxx”,
“address_prob”: “xxxx”,
“address_entities”: {
“province”: “xxxx”,
“district”: “xxxx”,
“ward”: “xxxx”,
“street”: “xxxx”
},
“doe”: “xxxx”,
“doe_prob”: “xxxx”,
“type”: “xxxx”
}
]
}
And this is the returned information of ID Card’s back side:
{
“errorCode” : 0,
“errorMessage” : “”,
“data”: [
{
“religion_prob”: “xxxx”,
“religion”: “xxxx”,
“ethnicity_prob”: “xxxx”,
“ethnicity”: “xxxx”,
“features”: “xxxx”,
“features_prob”: “xxxx”,
“issue_date”: “xxxx”,
“issue_date_prob”: “xxxx”,
“issue_loc_prob”: “xxxx”,
“issue_loc”: “xxxx”,
“type”: “xxxx”
}
]
When there is an error, the system will return clear and specific messages to guide users how to use API correctly. The system use these error codes:
- Error Code – No meaning
- No error
- Invalid Parameters or Values! – Wrong parameters in requests (no key or image in request body)
- Failed in cropping – Not enough corners of ID Card in photo to crop it into standard format.
- Unable to find ID card in the image – The system does not find ID Card in the photo or the photo has low quality (too blurry, too dark/bright).
- No URL in the request – Request uses the key image_url but the value is empty.
- Failed to open the URL! – Request uses the key image_url but the system cannot open this URL.
- Invalid image file – Uploaded file is not an image.
- Bad data – Image file has a problem or its format is not supported.
- No string base64 in the request – Request uses the key image_base64 but the value is empty.
- String base64 is not valid – Request uses the key image_base64 but the provided string is invalid.
After connecting API OCR from NodeJs, your screen will display:
const express = require(‘express’);
const router = express.Router();
var FormData = require(‘form-data’);
const fetch = require(‘node-fetch’);
router.post(‘/’, function (req, res, next) {
try {
let data = new FormData();
data.append(‘image_base64’, req.body.data);
fetch(‘https://api.fpt.ai/vision/idr/vnm’, {
method: ‘POST’,
headers: {
‘api_key’: ‘******’
},
body: data
})
.then(response => response.json())
.then(resData => {
try {
if (resData.data[0]) {
res.json({message: “OK”, data: resData.data[0]});
} else {
res.json({message: “Not OK”});
}
} catch (e) {
res.json({message: e});
}
})
.catch((e) => {
res.json({message: e});
});
} catch (e) {
res.json({message: e});
}
});
module.exports = router;
In this article, the author shows us how to call API by NodeJs in detail. However, there are many other ways to call API by many other languages. Readers can find more here.
2. Frontend
After connecting API OCR in the backend, the author uses ReactJS to display information on website. Firstly, we create information to get from API OCR in state.
constructor(props) {
super(props);
this.state = {
id: ”,
id_prob: ”,
name: ”,
name_prob: ”,
dob: ”,
dob_prob: ”,
town: ”,
town_prob: ”,
address: ”,
address_prob: ”,
Next, we take information in backend and assign value to the defined information in state.
axios.post(‘/api/ocr’, {
data: values.image
})
.then((response) => {
this.hideLoader();
if (response.data.message === “OK”) {
this.setState({
id: data.id,
name: data.name,
dob: data.dob,
town: data.home,
address: data.address,
id_prob: data.id_prob,
name_prob: data.name_prob,
dob_prob: data.dob_prob,
town_prob: data.home_prob,
address_prob: data.address_prob,
})
} else {
this.toggleDanger();
}
})
.catch((error) => {
this.toggleDanger();
});
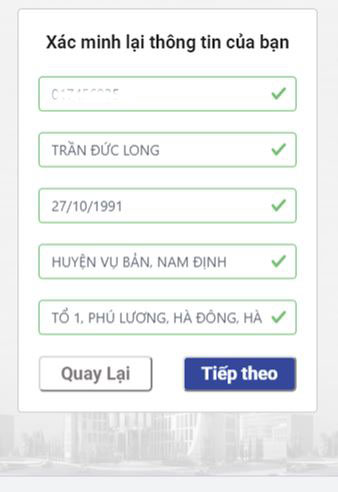
Display values on website, the information about name for example:
Row>
<Col className=”was-validated text-center”>
<Input type=”text” className=”form-control-warning” name=”name”
onChange={this.handleChange}
defaultValue={this.state.name}
data-toggle=”tooltip” data-placement=”right”
title={“OCR: ” + this.state.name_prob + “%”}
placeholder={strings.plc_name}
required/>
</Col>
</Row>
The result: 

We can finish connecting API OCR right from ReactJs without going through NodeJs. But this will reveal the endpoint and API_key if someone tries to join the network. With API having important information, the author recommends not to call directly through the frontend. The way to call API directly by ReactJs:
fetch(‘https://api.fpt.ai/vision/idr/vnm’, {
method: ‘POST’,
headers: {
‘api_key’: ‘***********’
},
body: data
})
.then(resData => {
if (resData.data[0]) {
this.setState({
id: data.id,
name: data.name,
dob: data.dob,
town: data.home,
address: data.address,
id_prob: data.id_prob,
name_prob: data.name_prob,
dob_prob: data.dob_prob,
town_prob: data.home_prob,
address_prob: data.address_prob,
})
} else {
this.toggleDanger();
}
})
FPT.AI is a comprehensive Artificial intelligence platform that provides the best technology solutions to businesses. Besides, FPT.AI provides free APIs with high quality such as: FPT.AI Conversation, FPT.AI Vision, FPT.AI Speech, allowing developers to develop their ideas based on data given by API. Some of FPT.AI applications are virtual assistant, chatbot, virtual agent for call center, eKYC, etc., which are the key for businesses to deploy automation, optimize operations, support customers and boost efficiency.
Trần Đức Long – FPT Head Office


